Target Lab: Stop Measuring Distance, Start Measuring Proximity
Every launch monitor ever made answers the same question: how far did that go? Carry, total, ball speed, spin, apex — a dozen numbers about the shot's magnitude.
On this page
Not one of them tells you whether you hit it close.
That's the gap Target Lab exists to close. Because on a golf course, nobody has ever written a number on a scorecard for carry distance. What goes on the card is a function of how close you finished to the flag — and that is a different measurement with a different answer.
Why we built it
Here's the thing that kept coming up in real range sessions: a golfer would hit twenty wedges, look at a screen that said "average carry 74 yards, standard deviation 4.1," and conclude their wedge game was in good shape.
Then they'd get on the course and leave it 30 feet short.
Both things were true. The wedge was consistent. But consistency around the wrong number is just a reliable miss, and a launch monitor pointed down an empty range has no opinion about where the hole is. It measures your shot in a vacuum.
The moment you put a target at a known distance and start scoring the gap, three things surface immediately that a carry average will never show you:
- A directional bias you'd otherwise average away. Eleven shots four yards short and one shot eight long produces a carry average that looks perfect. You are not perfect. You are short.
- Which distances you actually own. Most golfers are far better at one end of their wedge range than the other, and almost nobody can tell you which end without measuring.
- What your miss pattern really is. Short-right is a completely different fault from long-left, and the fix for one makes the other worse.
Target Lab is the part of ShotIQ that measures the second number — the one your score is actually made of.
How it works
The logic is deliberately plain. You tell ShotIQ the distance you're aiming at; it already knows how far each shot carried; the difference is your depth error. Combine that with the side dispersion your monitor records and you get a true two-dimensional leave — the real distance from ball to flag, not just the long/short component.
Everything else in Target Lab is built on that one honest number.
Logging a session — three ways in
1 · Your launch monitor's own target mode. Most units (Rapsodo MLM2 PRO, Garmin R10, SkyTrak, TrackMan, Uneekor, Foresight) let you set a target yardage before you hit, and stamp it into the export. Export the CSV, drop it into ShotIQ, and every target is detected automatically along with the device's own hit/miss scoring.
2 · Any session, tagged after the fact. No target mode? Hit ten balls at a flag, export as normal, and on upload set the session type to Target practice. ShotIQ will ask for the distance you were aiming at.
3 · A screenshot. Photograph the shot table on your monitor's screen and upload the image. ShotIQ reads the carries straight off it.
Whichever route you take, one thing is worth saying plainly, because it's the most common upload mistake:
Tag the session honestly. ShotIQ routes target practice away from your bag carries by default. That's deliberate — a shot you shaped at a flag inside your full number isn't a stock full swing, and letting those into your bag averages is exactly how a caddie ends up under-clubbing you. If you genuinely hit full swings at that target, you can switch bag carries back on at upload, and there's a section at the end of this guide about doing it properly.
Reading the outputs
Accuracy by distance
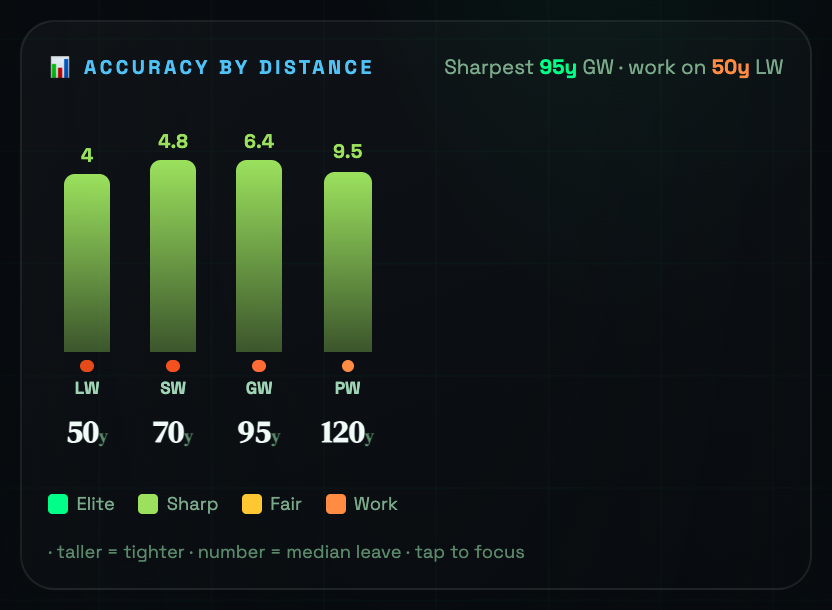
This is the headline view, and it is the opposite of a carry chart: shorter bars are better, because the bar is your median leave. Read it left to right and you get something most golfers have never seen — a profile of accuracy across their scoring range.
The reason median is used rather than average is worth knowing. One shanked wedge would drag an average leave from 5 yards to 9 and tell you your whole distance is broken. The median ignores the outlier and reports what a typical shot did, which is the thing you can actually plan around.
Strongest and weakest
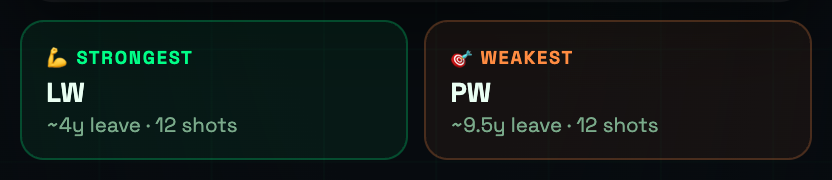
Two cards, no interpretation required. The point of this pair is to convert a chart into a practice decision — most range time is spent on whatever the golfer enjoys hitting, which is very rarely the distance costing them shots.
The proximity map
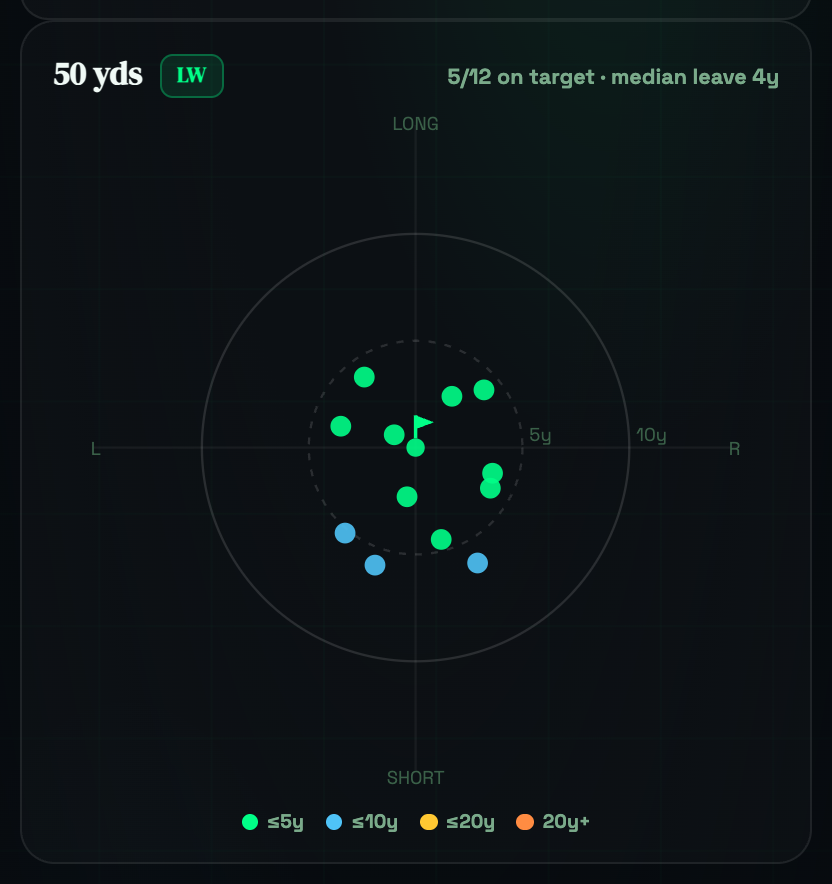
This is where the pattern lives. Each dot is one shot, plotted by depth (long/short) and side (left/right), coloured by how close it finished.
What to look for, in order:
- Where's the centre of the cluster? Not the spread — the centre. If the middle of your pattern sits below the line, you are systematically short, and no amount of "hitting it better" fixes that. Take more club or make a bigger swing.
- Is it round or is it stretched? A tall, thin cluster means your distance control is the problem. A wide, flat one means it's your face control. Those need completely different practice.
- Only then, how big is it? Size is the last thing to fix, because a tight cluster in the wrong place is still a miss.
The single most common read on this chart is a cluster hanging short and slightly left — which is the classic signature of a decelerating, steered wedge. That's a commitment problem, not a technique problem, and it shows up here in a way it never shows up in a carry average.
Your scoring windows — the whole bag, not just the wedges
Below the per-distance chart sits a second view that pools every session you've ever logged into distance bands, from 30 yards out to your longest club.
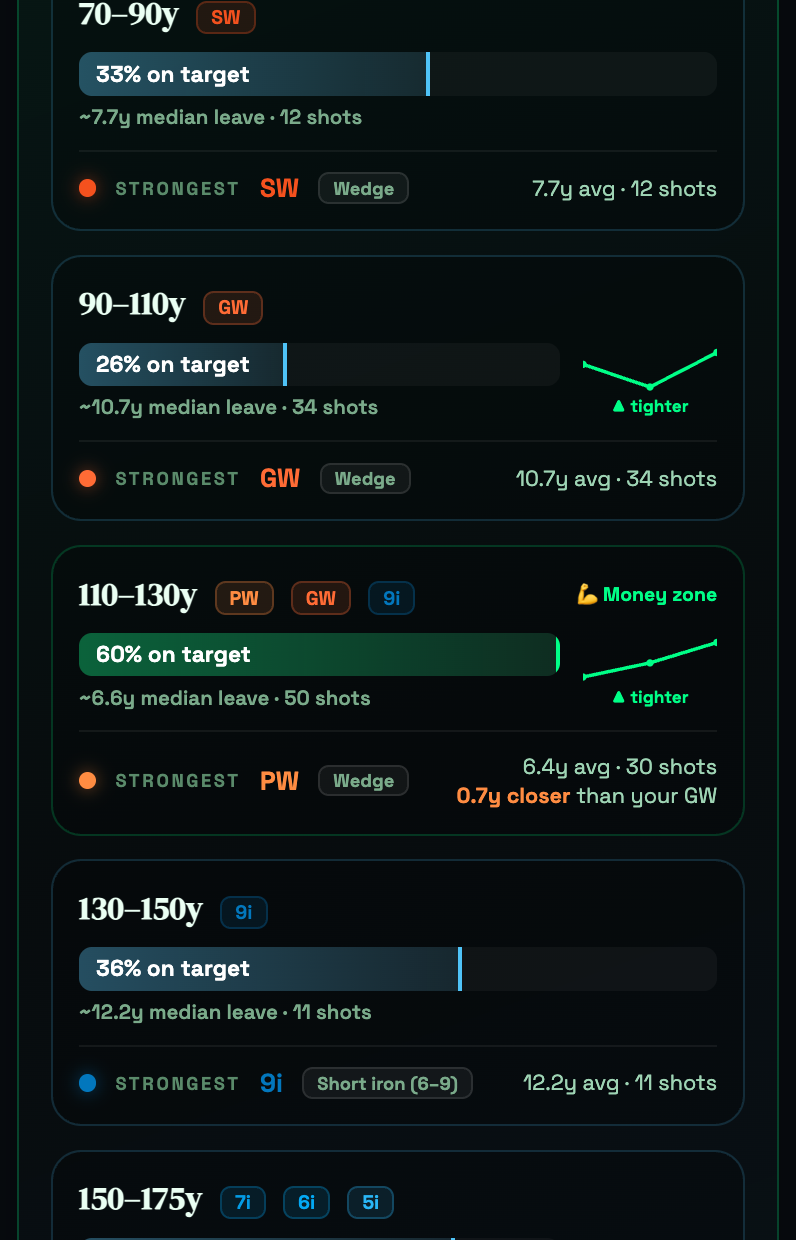
Two things about it are deliberate.
The bands get wider as they get longer. Twenty yards separates two wedges; between two woods it separates nothing at all. So the resolution follows where precision actually matters — 20-yard bands through the scoring zone, 25 through the mid irons, 30 for the woods. A single "110+" bucket, which is what this used to be, puts a pitching wedge and a driver in the same bar and tells you nothing about either.
The ladder ends where your bag ends. It's built from the longest club you have a carry for, so you won't be shown a 250–280 window if your driver goes 200, and a 230-yard target won't fall off the end if it goes 260. Windows you've never logged appear dimmed rather than hidden — an empty row is information, because it names the part of your bag you have never actually scored.
Each band names your strongest club there. Not the club you hit most — the club that finishes closest, with its median leave, its sample size, and how much better it is than the next one:
STRONGEST · PW · Wedge · 6.4y avg · 30 shots · 0.7y closer than your GW
That last number is the one to act on. A club that finishes a yard closer from 110 is worth more than any swing thought, and it costs you nothing to simply hit it more often.
It won't crown a club on a fluke. A club needs at least five shots in the band to be eligible, so one lucky wedge never beats a club with thirty honest ones — and if only one club qualifies, it's named without any claim to being better, because best-of-one isn't a finding.
Elevation — the correction almost nobody makes
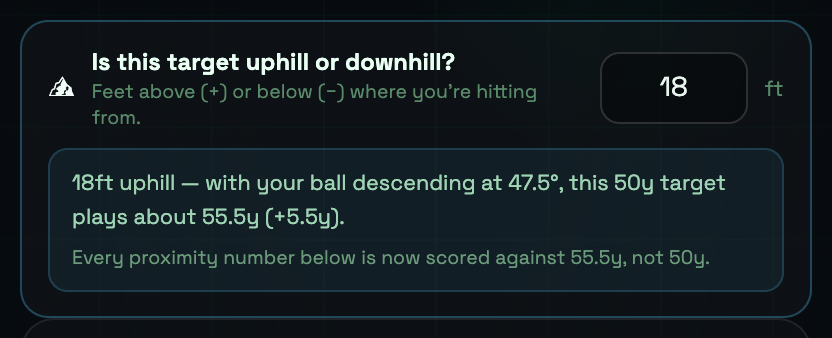
Here's a subtlety that matters more than it sounds. Your launch monitor reports carry to the plane it's sitting on. It has no idea where your target is, or how high it sits. So if the flag you're hitting at is up on a plateau, the monitor's number is unchanged — but the shot had further to travel.
ShotIQ works the adjustment out from your ball's own descent angle, rather than the usual rule of thumb of "add a yard for every three feet." That matters because the ground a hill costs you depends entirely on how steeply the ball is coming down: a lob wedge dropping at 52° barely notices an 18-foot rise, while a 6-iron arriving at 38° loses nearly twice as much.
Type the elevation once, per target, and every proximity number below re-scores. Golfers who do this on an uphill range bay routinely find they were several yards shorter than the app had been telling them — which is exactly the correction that stops you under-clubbing on the course.
Turning it into bag distances
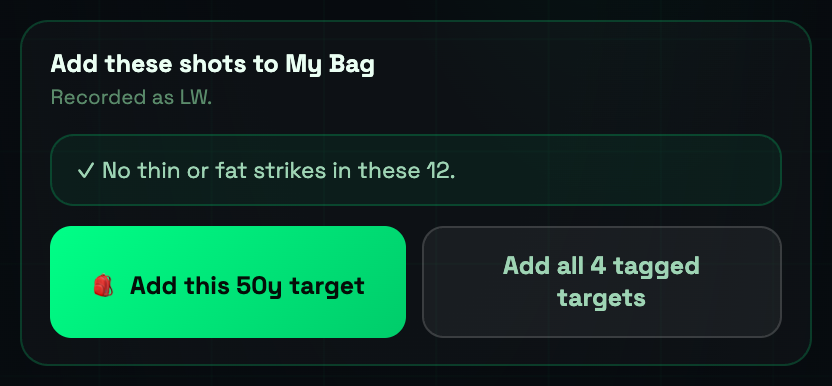
If the shots you hit at a target really were full swings, they're perfectly good carry data and there's no reason to throw them away. Target Lab will promote them into your bag — with two guards worth knowing about:
- Mishits are checked first. Thin and fat strikes are identified against that club's own median in that session and left out by default. Two bladed wedges can drag a genuine 74-yard club down to 70, and hand-deleting shots is not a workflow anybody sticks to. Off-centre strikes stay in, deliberately — missing the middle is normal golf, and excluding those would quietly inflate every number in your bag.
- Two clubs at one flag become two clubs. If you hit an 8-iron and a 7-iron at the same target, promoting all of them under one label would invent a carry that belongs to neither. ShotIQ splits them.
Note that elevation is not applied to bag carries, on purpose. Flat carry to the launch plane is the correct number for your bag; the hill only ever changed what the target demanded.
Are you actually getting better?
Everything above reads one session. This reads all of them.
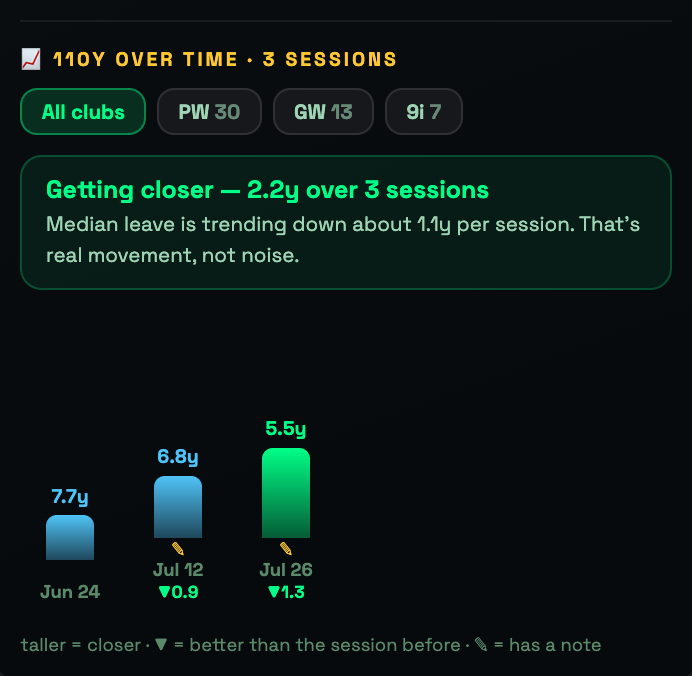
Pick any distance on the accuracy chart and it opens a second view underneath: your median leave at that number, session by session, oldest to newest. It is the only screen in golf that answers the question you actually care about — not "how good am I from 110 yards" but "am I better from 110 yards than I was in June?"
The verdict is deliberately hard to earn
Median leave is noisy. Wind, lie, which balls you had in the bag, how many holes you'd walked that morning. Draw a line through three of those numbers and it will always have a slope — and reporting that slope as progress is the easiest lie a golf app can tell, because it's the thing you want to hear.
So the verdict has three states and it will not skip ahead:
| Sessions | What you get | Why |
|---|---|---|
| 1–2 | "Two sessions is a comparison, not a trend" | You get the delta — 2.5y closer than last time — and nothing more |
| 3+, movement inside the scatter | Holding steady | The change is smaller than your session-to-session noise. That's flat |
| 3+, movement clears the scatter | Getting closer — 2.2y over 3 sessions | Real movement, with the per-session rate |
"Holding steady" is not a failure to compute something. It's the finding. Most practice, most of the time, holds — and knowing that is what stops you from changing a wedge that was never the problem.
Filter by club, and watch the story change
This is the part worth the price of admission.
At the top of the progress view are the clubs you've actually hit at that distance. Tap one and the whole series re-reads through that club alone.
Here's a real example from three sessions at 110 yards:
- All clubs: Getting closer — 2.2 yards over 3 sessions. Real improvement.
- Pitching wedge only: Holding steady. Flat.
Both are true, and together they say something neither says alone: this golfer didn't get better at 110 yards — they got better at choosing. They stopped mixing a 9-iron and a gap wedge into that number and standardised on the pitching wedge. The wedge is exactly as good as it was in June. The scoring improved because the decision improved.
That's a completely different lesson from "keep grinding the wedge," and you can only see it because the club filter and the honesty rule are in the same view. A tool that reported "improving" for both would have taught you the wrong thing twice.
Write down what changed
Every session in the series takes a note. Tap a bar, tap Add a note, and say what was different — "switched to the 56", "first session after the lesson", "into a two-club wind", "new balls".
Sessions carrying a note get a ✎ on the chart, so six weeks later the point where your leave dropped two yards isn't a mystery. Anything you typed in the upload box comes through here too, so a note you made at import shows up against the right session automatically.
This sounds like housekeeping. It is the difference between a chart and a training log. A number that moved without a reason is trivia; a number that moved the session after you changed your ball position is a finding you can repeat.
How to use it, concretely
- Pick the distance you practise most, not the one you're best at.
- Read the unfiltered verdict first. Improving, holding, or not enough sessions yet.
- Then filter by each club. If the whole is improving but every club is holding, your gains are coming from selection — bank that and stop tinkering with technique.
- Note anything you changed. Equipment, setup, a lesson, conditions.
- Come back in three sessions. Not one — the verdict needs three to say anything, and that's on purpose.
A session worth running this week
Four targets, twelve balls each, about twenty-five minutes:
| Target | Club | What you're testing |
|---|---|---|
| 50y | Lob or sand wedge | Touch — the distance most rounds are decided at |
| 70y | Sand wedge | The awkward in-between number |
| 95y | Gap wedge | Your stock scoring club |
| 120y | Pitching wedge | The top of your wedge range |
Hit them in blocks, one target at a time, and don't clean up the data afterwards. The mishits are information. A session where you quietly ignore the four bad ones tells you nothing about the golfer who will show up on Saturday.
Then read it in this order: median leave by distance first (which distance is worst?), then the proximity map for that distance (short, long, or sideways?), then one practice priority. One. A range session with four priorities is a range session with none.
What good looks like
Rough guides from amateur data, not tour numbers — use them to know whether a distance needs work, not to feel bad:
| Distance | Solid | Sharp |
|---|---|---|
| 50y | inside 6y median leave | inside 4y |
| 70y | inside 8y | inside 5y |
| 95y | inside 10y | inside 7y |
| 120y | inside 13y | inside 9y |
Notice that leave grows with distance — that's normal and expected. What isn't normal is a distance that breaks the pattern. If your 70-yard leave is worse than your 95, you've found something real, and it's almost always a swing you don't have a length for.
Frequently asked questions
Do I need a launch monitor with a target mode? No. Target mode makes it automatic, but you can hit at any flag or marker with any monitor, then set the session type to "Target practice" on upload and enter the distance yourself.
Why is my median leave worse than my carry standard deviation suggested? Because they measure different things. Standard deviation describes the spread of your carries around their own average. Median leave describes the distance from the hole. A tight group centred five yards short has excellent standard deviation and a poor leave — and only the second one costs you strokes.
Does target practice change my bag distances? Not unless you say so. Target sessions are routed away from bag carries by default, because a shot hit at a number inside your full swing isn't a stock carry. If they genuinely were full swings, you can promote them — ShotIQ filters the mishits and splits multiple clubs first.
How many shots per target do I need? Six is the minimum for the strike-quality checks to have a reliable median to compare against. Ten to twelve gives you a pattern you can trust.
Should I enter elevation for an indoor sim? No — an indoor sim's target is at the same height as the ball, so leave it at zero. Elevation is for outdoor bays and real greens that sit above or below where you're standing.
Why does one scoring window say a different club is strongest than I'd expect? Because it's measured on where the ball finished, not on how the shot felt. Golfers are consistently wrong about which club they're best with from an in-between number — it's usually the one that requires the least effort, not the one you enjoy hitting. If the sample is there (five shots minimum), trust the leave.
Why is one of my scoring windows greyed out? You've never logged a target in that range. It's shown rather than hidden because it's the part of your bag you haven't scored yet — often the 130–150 gap, which is where a lot of approach shots actually happen.
Why does it say "holding steady" when my numbers clearly went down? Because the drop is smaller than your session-to-session scatter. If your last three sessions were 9, 13 and 8 yards, the 8 looks like progress but sits well inside the noise of the 13. Target Lab only claims a direction when the movement is bigger than the wobble around it — otherwise you'd be told you're improving every time you had a good day.
Why do I need three sessions before it says anything? Two points always make a line, and that line means nothing. Three is the minimum where the movement can be compared against the scatter it sits in. With two sessions you still get the straight comparison — "2.5 yards closer than last time" — which is honest about being one session against one session.
The overall trend is improving but each club says holding. Which is right? Both, and together they're the most useful thing on the screen: your improvement is coming from club selection, not from any club getting better. You've stopped hitting the wrong club at that number. That's real scoring progress and it's worth knowing it's not technique.
What if my monitor doesn't record side/offline data? Target Lab still works — proximity falls back to the long/short component alone, and the app tells you that's what it's doing. You lose the left/right read on the map, not the distance-control read.